TimeBits Time tracker for monday.com is the ultimate integrated time tracking and time entry solution for monday.com. Whether you’re managing a small team or a large organization, TimeBits simplifies the process of recording time spent on tasks, approving entries, and generating insightful reports.
1. Installation
The app can be installed by administrators of your monday.com account by installing ‘TimeBits Timetracker’ directly from the monday.com marketplace.
To start using TimeBits, you must add it to a workspace. You can create a new workspace or choose a workspace you already created.
After installing the app, you must add TimeBits views to your workspaces. This can be done via the usual process using monday.com Marketplace or by using a template.
Installation from a template
If you want to experience all the capabilities of TimeBits Timetracker, we recommend using ‘TimeBits template’ that you can find in monday.com Template Center.
This template already has all the necessary views in place, together with pre-filled template projects and pre-set integrations and automations. Either add this template by clicking on the ‘+’ button in your board and searching for ‘TimeBits’, or use ‘Apps’ as shown below.
Installation in the Main workspaceTimeBits can be used in any workspace on monday.com. However, it may not function optimally in the main workspace. If you install the TimeBits app in the main workspace, you will be prompted to transfer the app and its associated boards to a separate workspace for better performance.
2. Features
2.1 Manage your Projects & Tasks
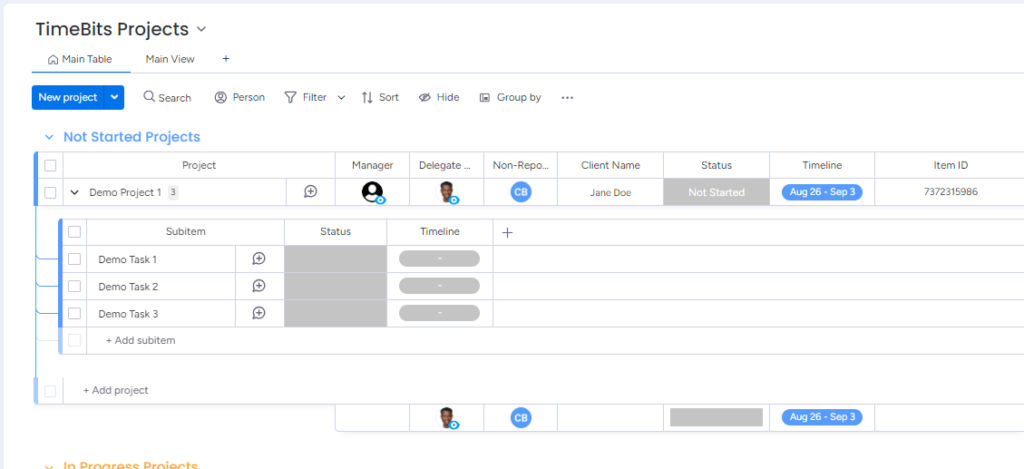
The ‘TimeBits Projects’ board allows you to manage your projects, create & assign tasks and assign managers to your tasks.
Step 1. Navigate to the ‘TimeBits Projects’ Board
Step 2. Add Projects & Tasks to Board
Add your project and the tasks related to the project.
Assign a manager to your Project.
If you have a Delegate Manager or a Non-Reporting Manager add them to your project. * The manager will be responsible for approving time entries on this project * The Delegate Manager assumes responsibilities when the main manager is on leave or unavailable. They can approve or reject entries just like the main manager. * Non-Reporting Manager can view submitted time entries but cannot approve or reject entries.
If this is a client project, Add the Client’s name to the project
Add the timelines for your project
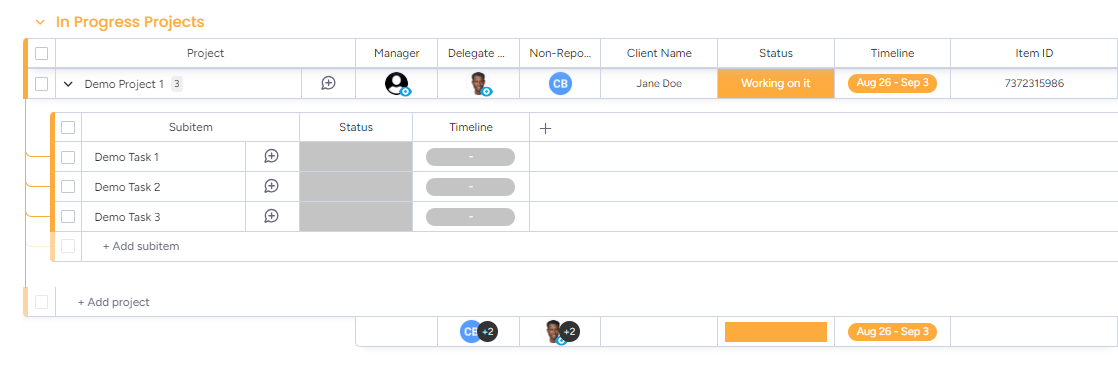
Step 3. In Progress Projects
Once your project is ready to start, mark the status as working on it and it will be automatically moved to ‘In Progress Projects’
(Your team can only add time entries to in progress projects)
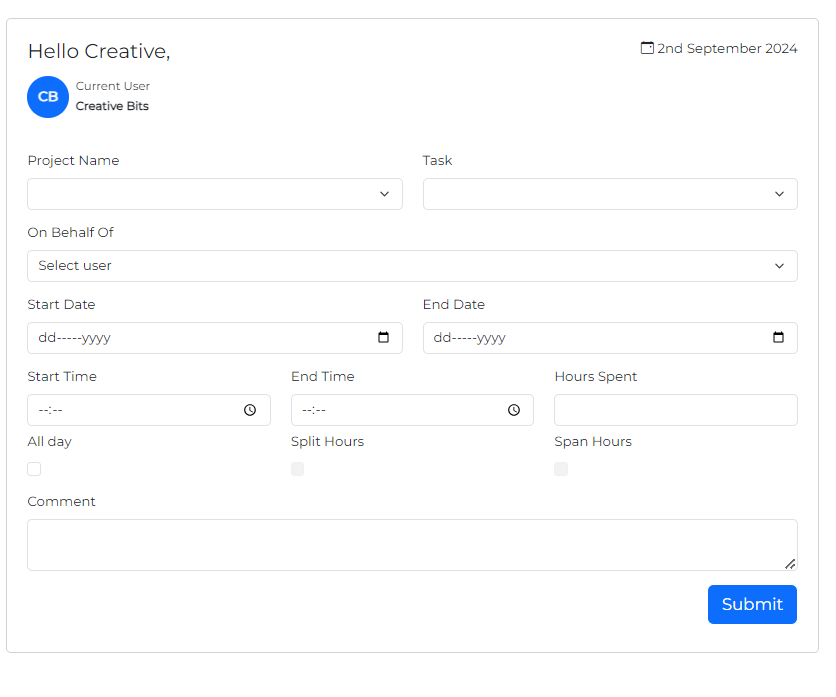
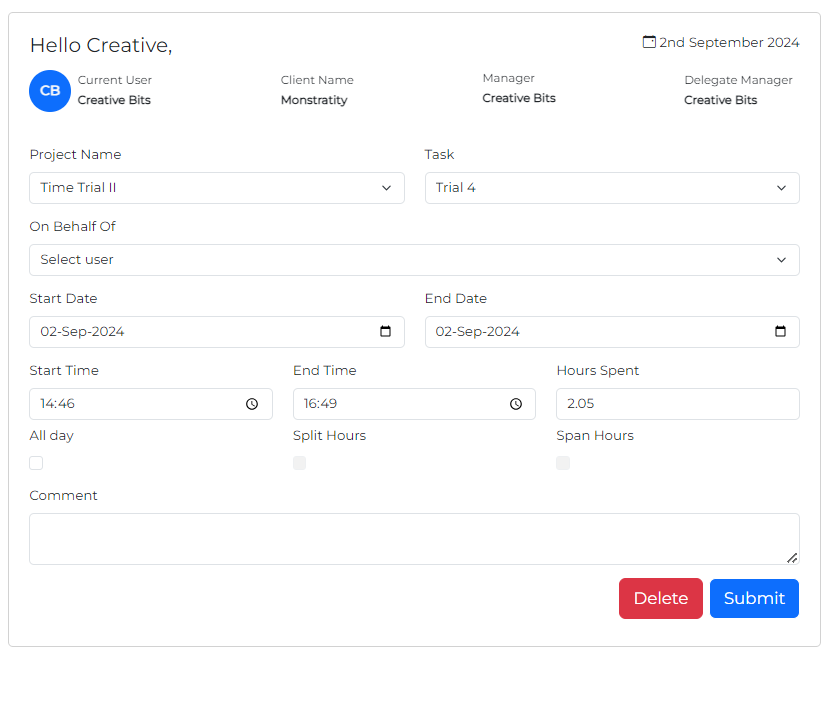
2.2 Adding Your Time Entries
Access the TimeBits app on your workspace
You will be presented with the Time Entry form to enter the time spent on your tasks.
Select the project & respective task you wish to track.
If you’re submitting this entry on someone’s behalf, select their name in the ‘On Behalf Of’ field.
Enter the start & end date
Enter the start & End Time of your entry. The app will automatically calculate the time spent on the task
Or Mark it as an ‘All day’ task and enter the hours spent on the task.
You must enter start & end times or select the ‘All day’ option to submit your entry successfully
All Day Entries
You select the ‘All day’ option and update the hours spent on a task
An ‘All day’ task does not require either the start time or end time
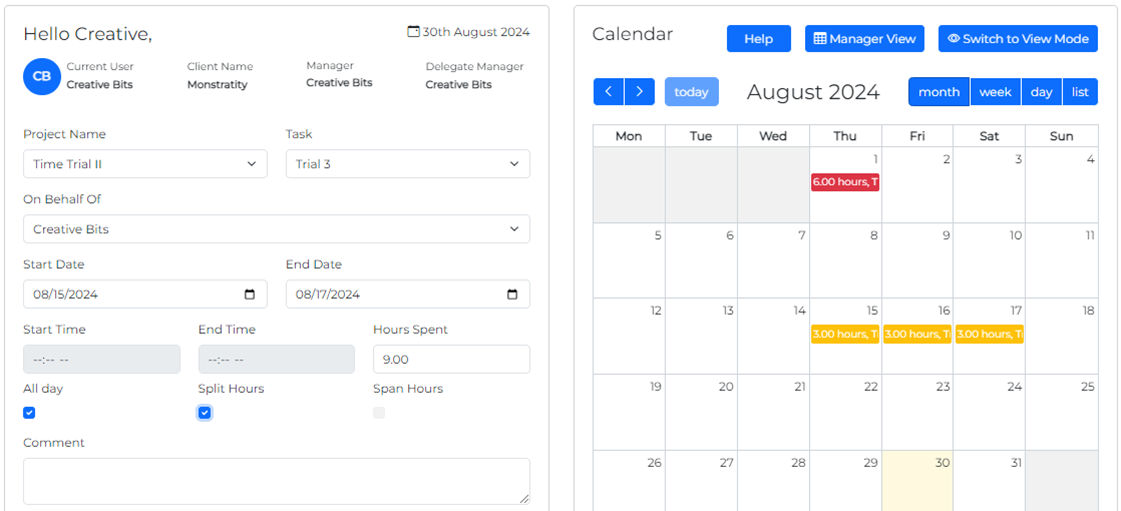
Multiday Time Entries
a) Split Hours
This allows you to create entries that span multiple days, with the ability to specify different start and end dates, hours spent, all-day status, and split hours. Upon submission, entries will be divided according to the number of days, with each day assigned equal hours.
To enter an entry with split hours,
Select the project & Task
Select who you’re entering it on behalf of. (optional)
Select the start & End date
Enter the total number of hours spent
Select the All day & Split Hours options
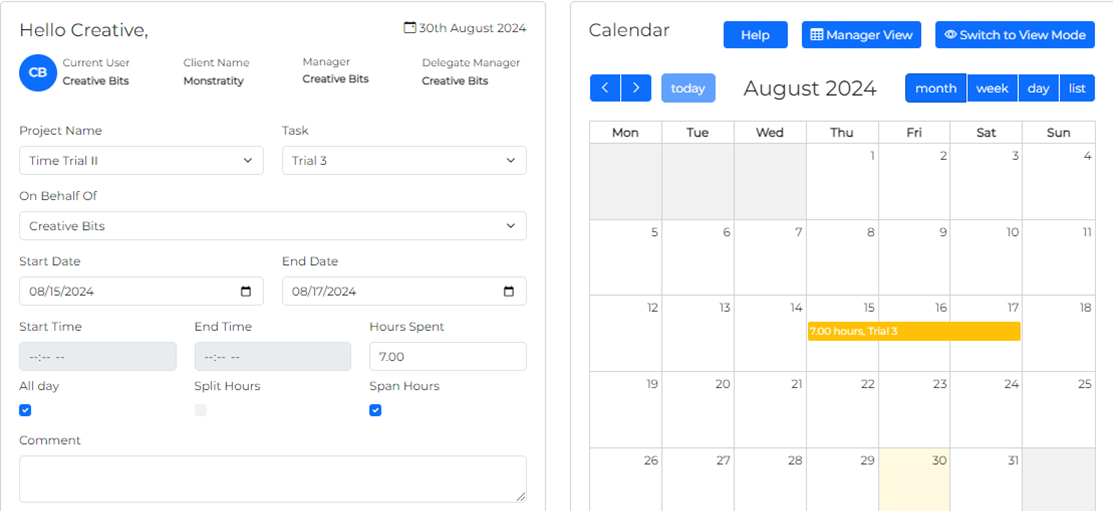
b) Span Hours
This allows you to create multi-day tasks with a consistent start and end date, hours spent, all-day status, and span hours. These entries will appear as a block on the calendar view, reflecting the entire span.
To enter an entry with span hours:
Select the project & Task
Select who you’re entering it on behalf of. (optional)
Select the start & End date
Enter the total number of hours spent
Select the All day & Span Hours options
2.2 Viewing Your Time Entries
The TimeBits app provides various ways to view your time entries
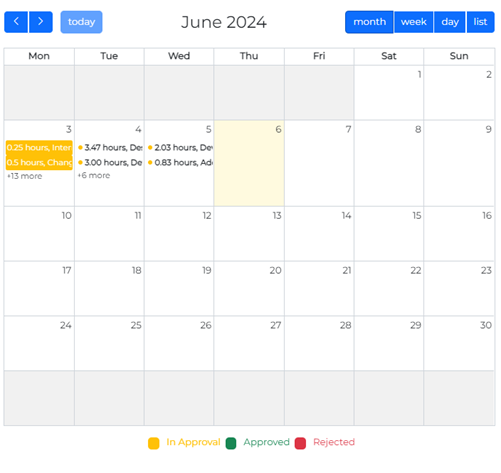
Month: See all your entries for the month in a calendar view
Week: Displays all your entries for the specific week
Day: Shows all your entries by day
List: Shows a list of all your time entries
Time Entries Statuses
In Approval: Time entries that are awaiting manager approval (Editable)
Approved: Entries that have been approved by a manager (Not Editable)
Rejected: Entries that have been rejected by a manager (Editable)
2.3 Editing Your Time Entries
Time entries in ‘In Approval’ and ‘Rejected’ statuses can be edited and updated. *Note: Users can only edit entries that they submitted
On the app, click on the ‘Switch to Edit Mode’ button
Click on any of the entries you’d like to update (only In Approval & Rejected)
Update the details on the Time entry form & submit
Great! You just updated your entry; your updated entry will be submitted for approval by your manager
3 Manager View
Users who have been designated as managers or delegate managers to projects can access the manager view to approve or reject time entries submitted for those projects. To access the manager view, click on the ‘Manager view’ button on the app
3.1 Time Entries Approval
The manager’s view shows you the time entries awaiting your approval for projects you manage. From this view, you can approve or reject individual entries or approve/reject entries in bulk.
3.1.1 Approve/Reject Individual Entries
To approve or reject a single time entry, look for buttons labeled “Approve” and “Reject” positioned near the individual time entry.
Click the appropriate button based on your decision:
“Approve” confirms the time entry and removes it from your queue.
“Reject” denies the time entry and removes it from your queue.
The chosen action (approve/reject) will be updated to the selected entry and the entry will be removed from your approval queue.
Entries will appear on the Calendar ‘View Mode’ with the updated status. Rejected entries can be edited/ updated and resubmitted for your approval.
3.1.2 Approve/Reject Multiple Entries
To approve/reject multiple time entries simultaneously, tick the checkboxes next to each time entry you wish to approve/reject in the approval queue.
Depending on your desired outcome, click either “Bulk Approve” to approve all selected entries or “Bulk Reject” to reject them. The status of these entries will be updated, and they will be removed from your approval queue.
System Instructions
This app contains folders required to keep it running smoothly. Do not attempt to make changes to the boards/folders labelled ‘Do Not Edit’